
 I've been fiddling with stars and decaogns forever in Inkscape, so it was fairly simple to make a design, export it to DFX, and bring it and a stack of construction paper to the Eugene Maker Space to laser.
 I could have made a design that fit on a 12 inch by 16 inch piece of paper, but I'm glad that I stuck with regular-sized paper because the end design would have been inconveniently large. I closed down CADQ and restarted it fresh, and the system worked without problems. I told the laser software that I was using construction paper, set a thickness of 0.005 inches... and four minutes later pulled out a laser-etched design on a sheet of paper. There was a smell of scorched wood fibers, but the design had not been cut out.
 At this point, I realized that I'd forgotten to bring the laser cutter's bed up to the focal length of the laser. I raised the bed to its full height and discovered that this was a little short of the recommended focal length suggested by the manual tool. If I'd been a purist, I would have found a half-inch tray of wood for the paper to sit on. I nudged up the thickness to 0.030 inches. Four minutes later, I had a design that was mostly cut out, except there were a few places where the fibers hadn't been severed all the way. I recalled something about green materials interacting with the laser and wondered if this particular shade of paper was reflecting the laser.
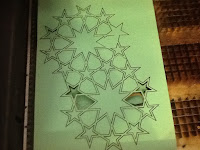 But it worked. I was ready to try halving my cutting time by cutting two -- two! -- sheets of paper at a time. Cutting multiple pages at a time would be much more quick than using a razor bladed Silhouette cutter-plotter. I nudged the laser's thickness cutting power to 0.060. The laser control flashed a warning: something about the power setting exceeding the recommended levels for paper. With the hubris of Victor von Frankenstein, I proceeded. About two minutes later the paper caught fire. I hastily halted the laser, snatched the still-burning paper out of the laser cutter's bed, and stomped the flames out while singing, "Crap crap crap crap!" Gentle reader, I beg you not to tread the paths of hauteur: heed the warnings of the machines, lest you feel the chastising heat of flame and ashes are the fruit of your artistic craft.
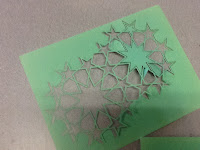 Taking the more cautious path, I resolved to set the thickness to 0.040 inches and double-cut single sheets of paper. I believe this is still speedier than the aforementioned Silhouette cutter-plotter, and it does have the advantage of not having to peel the finished design off of an adhesive cutting mat. Another advantage is that the laser cannot snag on the occasional thicker paper fiber, resulting in a torn product. The disadvantage, is that, once again, the laser reminds me that it's actually vaporizing/burning away the materials it cuts, and each page has a faint campfire aroma.
 I has the laser cutter produce seven copies of the design. I only needed six, but I figured having a spare would be a good thing in case I made some horrible error in construction. In any case, it was also the end of a long day, and I figured I should finish the construction when I was rested and less liable to make some sort of goofy mistake.
 The next day, I set out the design. I had been mulling over exactly how I was going to glue the designs together so I wouldn't have a gap or too much overlap in the finished dodecahedron. I put three of the designs together and mentally rolled the various stars around to make sure they aligned correctly. Popping out of two dimensions into a third is tricky for me, and I had to rely on my previous work and trust that everything would fold together.
  Since I'm pasting and bending twelve decagram together into a dodecahedron, the thing to keep straight was that every other "ray" from a decagram would be shared with an adjacent decagram, and that that ray would be perpendicular to the edge of the finished dodecahedron. The alternate rays would lead to a triangle of three stars, and would be analogous to a dodecahedron's vertex. I photographed the design with some dice to make things clearer to myself and to document the process for five years from now when I'm trying to remember how the heck I put everything together.
After that, it was a process of pasting overlapping stars.

And pasting....

And pasting...

And taking time out for artistic shots of nets of stars..

 After the first four or five stars had been joined together, it became much easier to see how and where to join the next set. I used the eraser end of a pencil to hold the stars together; I also used my fingers, but the Elmer's glue was more likely to adhere to my fingers, and the eraser against the table method resulted in flatter, less wrinkled joins.
This picture -- actually, the one above, too -- shows how a triad of stars comes together (look at the base of the tea mug, a little to the left).

More artistic photographs. Sometimes I think it could be interesting to make this out of some kind of shiny metal.

A completed bowl of six pentagonal faces joined together. Someone at the Maker Space had wondered how rigid the structure would be; once all the stars are glued together, the structure is fairly rigid.

Two bowls side by side.

Now I have to make sure that I'm putting them together correctly.

The dice make a reappearance to show which rays lead to decagrams and which lead to star triads.

Another documentation photo.

Working the two rims of the stars together.

Art shot.

Combining flat stars groups of stars together into an undistorted three dimensional pattern is very satisfying to me.

Finished dodecahedron from above, with the spare mesh to one side.

I'm pretty sure I have to go read some William Blake poetry now.
No comments:
Post a Comment